Tiếp tục là 1 giao diện mới cho tiện ích recent posts, hôm nay theo yêu cầu của bạnthienthan mình sẽ giới thiệu cho các bạn 1 dạng mới, dạng này nó cũng gần giống như dạng hiển thị bài viết giống trang news.zing.vn (có thể xem lại thủ thuật ở đây) . Vì là tiện ích quá quen thuộc nên mình sẽ không hướng dẫn chi tiết.
Hình ảnh minh họa
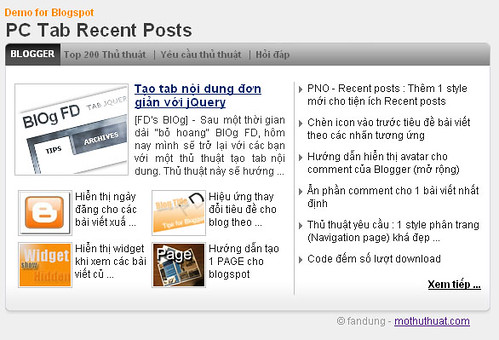
Xem DEMO : PC Tab Recent Posts
* Các bước thực hiện :
1. Vào bố cục
2. Vào phần tử trang
3. Tạo 1 widget HTML/javascript rồi dán code bên dưới vào:
* Các bước thực hiện :
1. Vào bố cục
2. Vào phần tử trang
3. Tạo 1 widget HTML/javascript rồi dán code bên dưới vào:
<link href="http://data.fandung.com/blog/demo/PCtab-recentposts/style.css" rel="stylesheet" type="text/css" />
<style type="text/css">
.top-left
{
    background-image:url(http://data.fandung.com/blog/demo/PCtab-recentposts/gray-box-top.png);
    background-repeat:repeat-x;
    background-position:right center;
    height:29px;
}
.top-right
{
   background-image:url(http://data.fandung.com/blog/demo/PCtab-recentposts/gray-box-top.png);
   background-repeat:repeat-x;
   background-position:left center;
   margin-right:5px;
   height:28px;
   padding-top:1px;
}
.bottom-left
{
    margin:0;
    padding:0;
    vertical-align:top;
    background-image:url(http://data.fandung.com/blog/demo/PCtab-recentposts/red-box-bottom.png);
    background-repeat:repeat-x;
    background-position:left top;
    height:8px;
}
.bottom-right
{
    margin:0;
    padding:0;
    vertical-align:top;
    background-image:url(http://data.fandung.com/blog/demo/PCtab-recentposts/red-box-bottom.png);
    background-repeat:repeat-x;
    background-position:right top;
    height:8px;
    margin-left:10px;
}
</style>

  <div class="article-list-tabbed-box">
    <div class="top-left">
        <div class="top-right" style="padding-left: 7px;">
           <div style="float: left; margin-right: 4px; font-size: 11px;cursor: pointer; font-weight: bold" class="is-section"> Blogger</div>
            <div class="sc_menu" style="float: left; overflow-x: hidden; overflow-y: hidden; ">

                         <ul class="tab-header sc_menu">
                            <li class="tab-name" ><a href="#">Top 200 Thủ thuật</a></li>
                            <li class="sep">|</li>
                            <li class="tab-name" ><a href="#">Yêu cầu thủ thuật</a></li>
                            <li class="sep">|</li>
                            <li class="tab-name"><a href="#">Hỏi đáp</a></li>
                         </ul>
            </div>
            <div style="clear: both"></div>
        </div>
    </div>

<div style="clear: both;" class="zone">

<script type="text/javascript">
home_page = "http://www.fandung.com/";
label = "Thu%20Thuat%20Blog";
numposts = 11;
sumTitle = 40;
sumTitle2 = 65;
sumPosts = 151;
textmore = "Xem tiếp ...";
labelURL = "http://www.fandung.com/search/label/Thu%20Thuat%20Blog?max-results=10";
</script>
 <script type="text/javascript" src="http://data.fandung.com/blog/demo/PCtab-recentposts/rc-post-PC.js"></script>

</div>
    <div class="bottom-left"><div class="bottom-right"></div></div>
</div>
- Nếu muốn hiển thị cho cả blog thì dùng file js bên dưới :
http://data.fandung.com/blog/demo/PCtab-recentposts/rc-post-PC-all.js
4. Save widget.
- Hình ảnh minh họa bên dưới sẽ giúp các bạn dễ điều chỉnh các biến hơn:
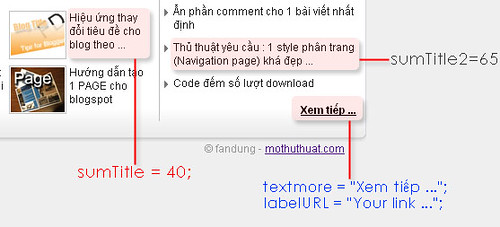
- Hình ảnh minh họa bên dưới sẽ giúp các bạn dễ điều chỉnh các biến hơn:
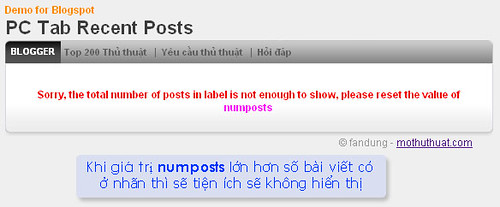
- Một chú ý nhỏ, nếu số bài viết bạn muốn hiển thị lớn hơn số bài viết có ở 1 nhãn thì tiện ích sẽ không hiển thị. Ví dụ 1 nhãn tên “Label1” hiện có 7 bài viết, nhưng giá trịnumposts bạn set là 8 thì tiện ích sẽ không hiển thị, khi đó bạn phải thay đổi lại giá trịnumposts thành 7 hoặc nhỏ hơn. Lưu ý, giá trị numpost không được nhỏ hơn 5.
Chúc các bạn thành công !
Không có nhận xét nào:
Đăng nhận xét